Thursday, December 22, 2011

Occasions Mini DSP and Stamp Set

This card showcases some Twitterpated DSP and the Mixed Bunch stamp set and punch from the Occasions Mini. I also used the hostess set, Perfect Words.
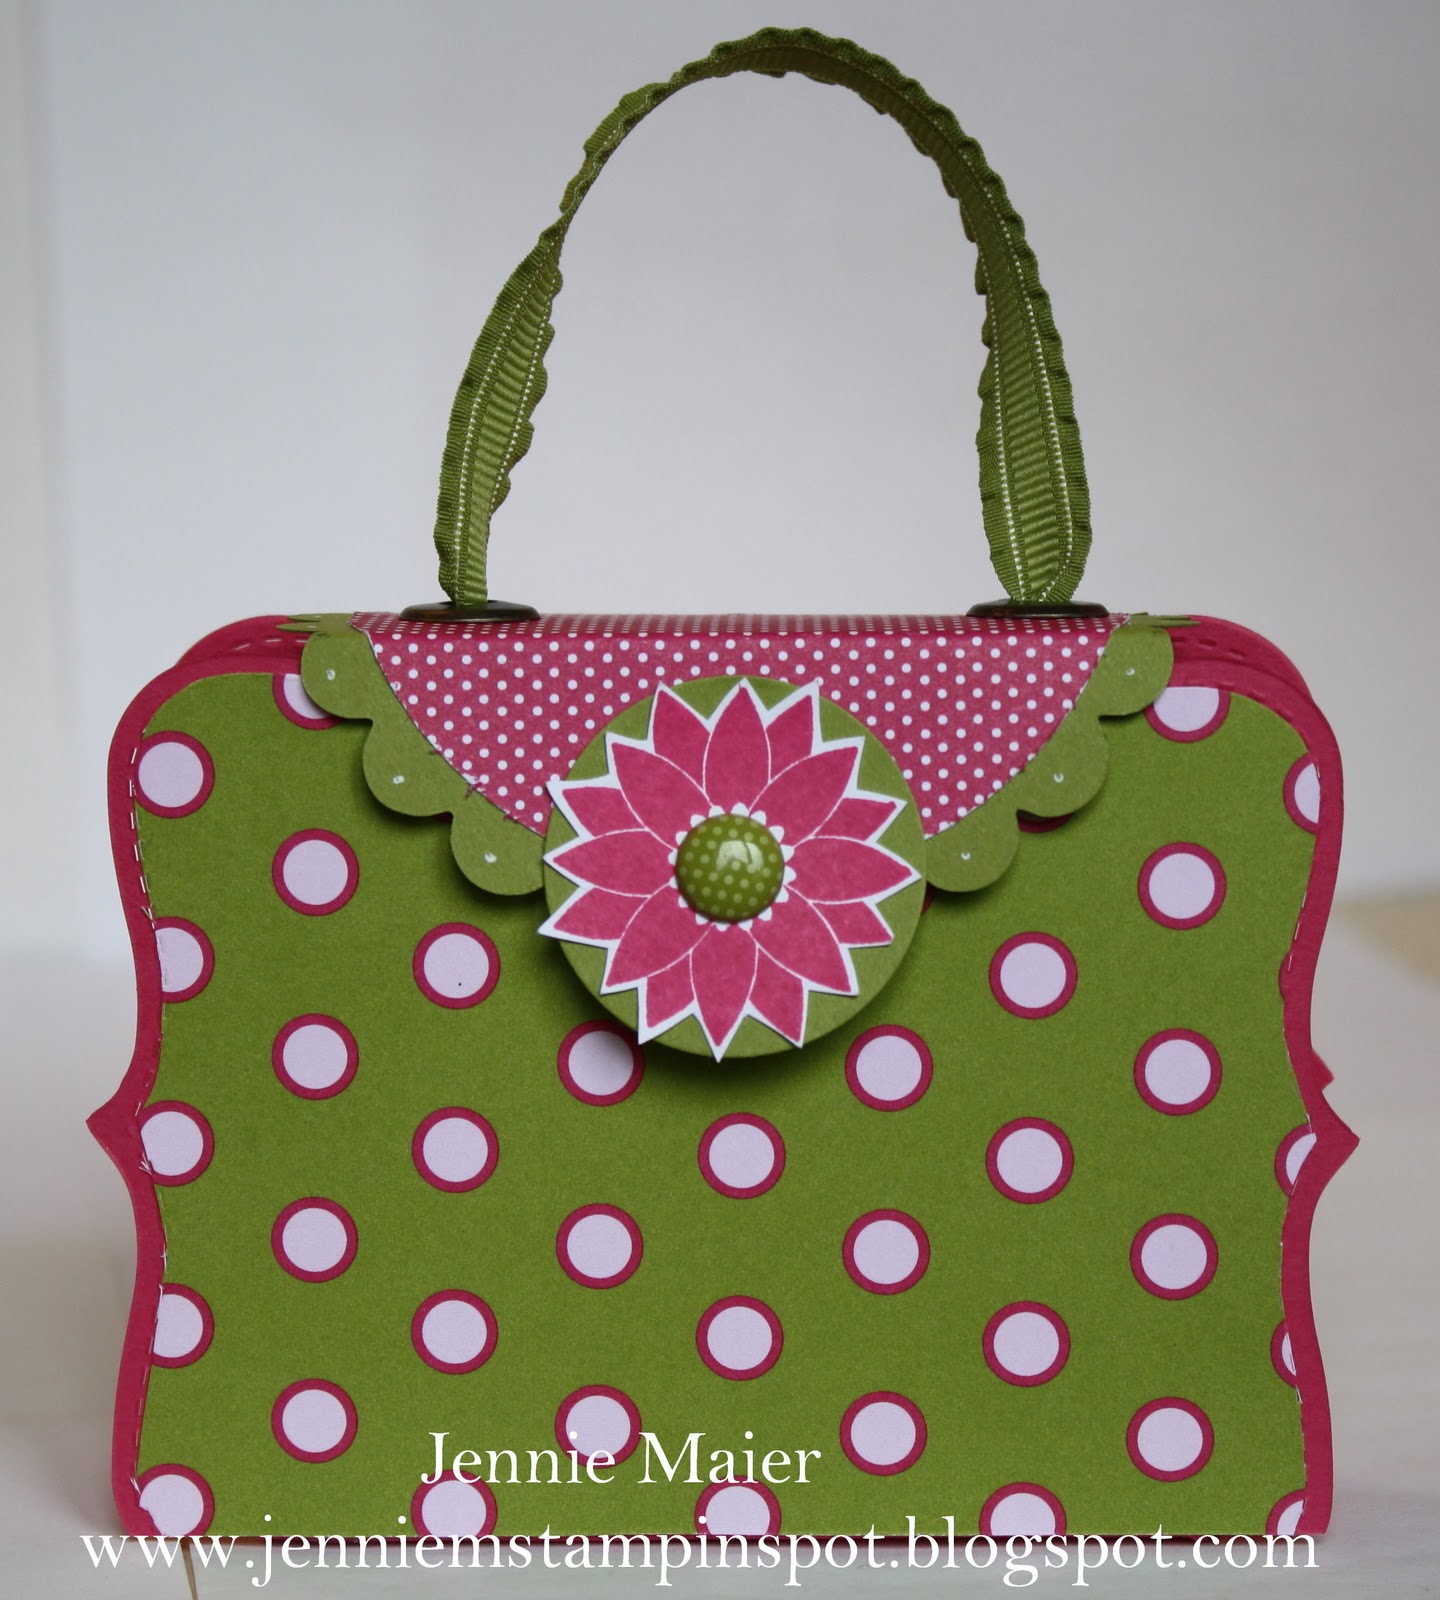
The base is Baha Breeze card stock. I ran some Island Indigo thru the Dotted Scallop Ribbon Border punch. I added two of the papers from Twitterpated DSP. I stamped the flower from Mixed Bunch in Island Indigo and punched it out with the Blossom Punch. I also punched out an Island Indigo one with the Blossom punch. I added an Indigo Designer Printed Brad to the center. I stamped You're Fantastic from Perfect Words in Indigo. Finally, some 3/8 inch Island Indigo ruffled ribbon finishes it off.
Here's my recipe:
Stamps: Mixed Bunch and Perfect Words
Papers: Baha Breeze, Whisper White, Island Indigo and Twitterpated DSP
Inks: Island Indigo
Accessories: Dotted Scallop Ribbon Border punch, Blossom Punch, 3/8 inch Island Indigo Ruffled ribbon, Island Indigo Designer Printed brad

Wednesday, December 21, 2011

Quick Christmas Card

Whew! It's been a while since I posted, but I think everyone can identify with the craziness of the season! This quick card was one of the last ones I made this year. It feels great to have them signed, sealed and delivered. This one would also qualify for the SUO Challenge#34 here. I started by running the Real Red card stock thru the Big Shot with the Snow Burst embossing folder. I stamped the ornament from Delightful Decorations in Real Red and used the Ornament punch to punch it out. I used the 1 3/4 inch Circle punch on the Whisper White circle and the 2 3/8 inch Scallop Circle punch on the Wild Wasabi piece. I added some dots with the White Gel pen and popped it up with Stampin' dimensionals. Finally, Merry Christmas from Season of Joy was stamped in Wild Wasabi.
Here's my recipe:
Stamps: Delightful Decorations and Season of Joy
Papers: Whisper White, Real Red, Wild Wasabi
Inks: Real Red and Wild Wasabi
Accessories: Snow Burst embossing folder, Ornament Punch, 1 3/4 inch Circle punch, 2 3/8 inch Scallop Circle punch, Stampin' dimensionals, White gel pen

Thursday, December 15, 2011

MojoMonday Sketch#219 Christmas Card

This card uses the MojoMonday Sketch#219 here.
The base is Real Red and I added some Wild Wasabi card stock. I also added three papers from the Holly Berry Bouquet Specialty DSP. I colored in the stamp from Season of Joy with my Real Red and Wild Wasabi Stampin' Write Markers, stamped it on Very Vanilla, cut it out and popped it up with Stampin' dimensionals. I punched the red circle with the 1 3/8 inch Circle punch. The Vanilla circle was punched with the 1 3/4 inch Circle punch and the Wasabi piece with the 2 3/8 inch Scallop Circle punch. I added some dots with the White gel pen. Finally, the greeting was stamped in Wild Wasabi.
Here's my recipe:
Stamps: Season of Joy
Papers: Very Vanilla, Real Red, Chocolate Chip, Wild Wasabi, Holly Berry Bouquet Specialty DSP
Inks: Real Red and Wild Wasabi
Accessories: 1 3/8 inch and 1 3/4 inch Circle punches, 2 3/8 inch Scallop Circle punch, Stampin' dimensionals

Wednesday, December 14, 2011

One Card, Two Splitcoast Challenges

This card uses two Splitcoast Challenges. First, the Splitcoast Sketch Challenge#363 here. And second, the Splitcoast Color Combination#353 here.
The colors to use are Crumb Cake, Always Artichoke and Cherry Cobbler.
The base is Crumb Cake card stock. I added some Frostwood Lodge DSP. I ran the Artichoke thru the Big Shot with the Snow Burst embossing folder. I colored the tree from Season of Joy with Cherry Cobbler, Crumb Cake and Always Artichoke Stampin' Write Markers. Finally, I added some 3/8 inch Quilted Cherry Cobbler Satin ribbon.
Here's my recipe:
Stamps: Season of Joy
Papers: Whisper White, Crumb Cake, Always Artichoke, Cherry Cobbler and Frostwood Lodge DSP
Inks: Crumb Cake, Cherry Cobbler and Always Artichoke Stampin' Write Markers
Accessories: Snow Burst embossing folder, 3/8 inch Cherry Cobbler quilted satin ribbon

Tuesday, December 13, 2011

Christmas Card for Two Challenges

I made this card for two challenges. First, I used the Stamping 411 Sketch#233 here. And second, I used the Create with Connie and Mary Color Challenge#179 here. The colors to use are Poppy Parade, Lucky Limeade and Basic Gray.
Basic Gray is the base and I added some Lucky Limeade. I stamped the snowflakes from Snow Swirled in Poppy, Limeade and Gray. I stamped the greeting in Poppy Parade and punched it out with the Extra Large Oval punch. I matted that with some Poppy Parade punched with the Curly Label punch, which I cut in half. I popped that all up with Stampin' dimensionals. I punched out the Limeade snowflake with the Snowflake punch and added a Red Circle Fire Rhinestone brad to the center. Finally, some 5/8 inch Basic Gray Satin ribbon finishes it off.
Here's my recipe:
Stamps: Snow Swirled
Papers: Whisper White, Basic Gray, Lucky Limeade, Poppy Parade
Inks: Basic Gray, Lucky Limeade and Poppy Parade
Accessories: Extra Large Oval punch, Curly Label punch, Stampin' dimensionals, Snowflake punch, Circle Fire Rhinestone brad, 5/8 inch Basic Gray Satin ribbon

Monday, December 12, 2011

Christmas Color Combination

I used the Splitcoast Color Combination#352 here for this card. The colors are Real Red, Wild Wasabi and Very Vanilla.
The base is Wild Wasabi and I added some Real Red DSP from the Patterns DSP Brights stack. I stamped the tree from Pennant Parade in Wild Wasabi and the star and stand in Real Red. I cut out the tree and stand. I punched out the star with the Itty Bitty Shapes punches pack. I popped them all up with Stampin' dimensionals. The 2 3/8 inch Scallop Circle punch was used on the Wasabi piece and the 1 3/4 inch Circle punch on the Very Vanilla circle. I colored in the greeting from Season of Joy with my Real Red and Wild Wasabi Stampin' write markers. I punched that out with the Large Oval punch and layered it onto a Wasabi piece punched with the Scallop Oval punch. Finally, some retired ribbon (I can't remember the name of) finishes it off.
Here's my recipe:
Stamps: Pennant Parade and Season of Joy
Papers: Very Vanilla, Real Red, Wild Wasabi, Patterns DSP Brights stack
Inks: Real Red and Wild Wasabi Classic pads and Stampin' Write markers
Accessories: Large Oval and Scallop Oval punch, 2 3/8 inch Scallop Circle punch, 1 3/4 inch Circle punch, Stampin' dimensionals, retired ribbon

Friday, December 9, 2011

Glittery Red Christmas Card

I made this glittery Christmas card and it definitely qualifies for the PPA#123-Puttin' on the Ritz, here.
The base is Real Red. On Crumb Cake, I stamped the snowflake from Snow Swirled in Versamark, added Heat & Stick powder and then some Red Stampin' Glitter. I punched out the Red Glimmer paper with the Extra Large Tag punch and 1 inch Circle punch. I stamped the greeting and Santa image from Tags til Christmas in Real Red and punched them out with the 3/4 inch Circle punch and Large Tag punch. I popped them up with Stampin' dimensioanls. Finally, some 5/8 inch Real Red Satin ribbon finishes it off.
Here's my recipe:
Stamps:  Snow Swirled and Tags til Christmas
Papers: Crumb Cake, Real Red, Whisper White, Red Glimmer paper
Inks: Versamark and Real Red
Accessories: 3/4 inch and 1 inch Circle punches, Large and Extra Large Tag Punches, Heat & Stick powder, Red Stampin' Glitter, Stampin' dimensionals, 5/8 inch Real Red Satin ribbon

Thursday, December 8, 2011

2012 Occasions Mini Sneak Peek

My pre-order arrived today so I had to play with some Occasions Mini products. I used the Splitcoast Sketch#362 here.
The base is Riding Hood Red card stock and I added papers from the new Twitterpated DSP. I ran the Basic Gray piece thru the Big Shot with the Vintage Wallpaper embossing folder. I stamped the flower from the new Mixed Bunch stamp set in Riding Hood Red and the center in Basic Gray. I used the new Blossom punch to punch out the flower and the 1 inch Circle punch for the center, popping it up with Stampin' dimensionals. I stamped the greeting from Petite Pairs in Riding Hood Red and punched it out with the Large Oval punch. Finally, some new 3/8 inch Riding Hood Red Pleated Satin ribbon finishes it off.
Here's my recipe:
Stamps: Mixed Bunch and Petite Pairs
Papers: Whisper White, Basic Gray, Riding Hood Red, Twitterpated DSP
Inks: Riding Hood Red and Basic Gray
Accessories: Blossom punch, 1 inch Circle punch, Large Oval punch, Stampin' dimensionals, 3/8 inch Riding Hood Red Pleated Satin ribbon, Vintage Wallpaper embossing folder

Wednesday, December 7, 2011

Tags til Christmas Ornament Card

I used the Tags til Christmas set to make this card.
I was inspired by this card I saw on Splitcoast here.
I started with Real Red card stock. I ran some Whisper White thru the Big Shot with the Snow Burst embossing folder. I stamped the ornament and "do not open til Christmas" stamp in Real Red. I used the Ornament punch to punch out the ornament and the 1 inch Circle punch on the other one. I stamped the Dec 25 one in Old Olive and punched it out with the Decorative Label punch. I used my Real Red and Old Olive Stampin' Write Markers to color in the holly stamp and punched it out with the Small Oval punch. I popped up all the ornaments with Stampin' dimensionals and added some Hemp twine. I stamped Season's Greetings from Curly Cute in Real Red. Finally, some 1/8 inch Real Red taffeta finishes it off.
Here's my recipe:
Stamps: Tags til Christmas and Curly Cute
Papers: Whisper White and Real Red
Inks: Real Red and Old Olive Classic Pads and Stampin' Write markers
Accessories:  1 inch Circle punch, Ornament punch, Small Oval punch, Decorative Label punch, Stampin' dimensonals, 1/8 inch Real Red taffeta ribbon, Snow Burst embossing folder

Tuesday, December 6, 2011

Clean & Simple Stamping FTL#169

Here's another quick card (and who doesn't need quick at this time of year?). I used the Clean and Simple FTL#169 here.
I started with Garden Green card stock and added some Whisper White, matted with Cherry Cobbler. I punched a circle of Frostwood Lodge DSP with the 2 1/2 inch Circle punch. I colored in the tree from Season of Joy with my Cherry Cobbler, Garden Green and Chocolate Chip Stampin' Write Markers. I popped up the tree with Stampin' dimensional. Finally,  I used my Cherry Cobbler and Garden Green Stampin' Write Markers to color the greeting.
Here's my recipe:
Stamps: Season of Joy
Papers: Whisper White, Garden Green, Cherry Cobbler, Frostwood Lodge DSP
 Inks: Cherry Cobbler, Garden Green and Chocolate Chip Stampin' Write markers
Accessories: 2 1/2 inch Circle punch, Stampin' dimensionals

Monday, December 5, 2011

Stamping 411 Sketch#232 Card

This card came together really quickly thanks to the Stamping 411 Sketch#232 here.
The base is Wild Wasabi and I added some Holly Berry Bouquet Specialty DSP and matted it with some Real Red card stock. I stamped Merry Christmas from Teeny Tiny Wishes in Real Red. I added some 1/4 inch Real Red grosgrain ribbon. Finally, a piece of holly from the Winter Wishes Stitched Felt finishes it off.
Here's my recipe:
Stamps: Teeny Tiny Wishes
Papers: Real Red, Wild Wasabi and Holly Berry Bouquet Specialty DSP
Inks: Real Red
Accessories: 1/4 inch Real Red grosgrain, Winter Wishes Stitched Felt

Friday, December 2, 2011

Merry Card for Two Challenges

I made this Christmas card for two challenges. First, I used the PPA#122 here. It's a color challenge to use Cherry Cobbler, Always Artichoke and Very Vanilla. Second, I used the Create with Connie and Mary Sketch Challenge#178 here.
The base is Cherry Cobbler and I added some Frostwood Lodge DSP. I ran the strips of Very Vanilla thru the Big Shot with the Snow Burst embossing folder. I stamped the images from Pennant Parade in Cherry Cobbler and Always Artichoke. I punched out the star with the Itty Bitty Shapes punches pack. Merry was punched out with the Small Oval punch and layered onto an Cherry Cobbler circle punched with the 1 inch Circle punch. I punched the Artichoke scallop with the 2 3/8 inch Scallop Circle punch and the Vanilla circle with the 1 3/4 inch Circle punch. I popped up the star and tree with Stampin' dimensionals. Finally, some 1/2 inch Always Artichoke seam binding finishes it off.
Here's my recipe:
Stamps: Pennant Parade
Papers: Very Vanilla, Always Artichoke, Cherry Cobbler, Frostwood Lodge DSP
Inks: Cherry Cobbler and Always Artichoke
Accessories: Snow Burst embossing folder, 2 3/8 inch Scallop Circle punch, 1 3/4 inch and 1 inch Circle punches, Small Oval punch, Stampin' dimensionals, 1/2 inch Always Artichoke seam binding, Itty Bitty Shapes punches pack

Thursday, December 1, 2011

Christmas Joy

I used the Splitcoast Sketch#361 here for this card.
The base is Real Red and I ran that thru the Big Shot with the Petals-a-plenty embossing folder. I added strips of Holly Berry Bouquet Specialty DSP. I colored in the stamp from Season of Joy with my Chocolate Chip, Real Red and Wild Wasabi Stampin' Write markers. I stamped the snowflake again, cut it out and added a Real Red brad. I popped it up with Stampin' dimensionals. Finally, I popped up the entire central panel with Stampin' dimensionals too.
Here's my recipe:
Stamps: Season of Joy
Papers: Very Vanilla, Chocolate Chip, Real Red, Wild Wasabi and Holly Berry Bouquet Specialty DSP
Inks: Chocolate Chip, Real Red, Wild Wasabi Stampin' Write markers
Accessories: Stampin' dimensionals, Petals-a-plenty embossing folder, Real Red brad

Wednesday, November 30, 2011

Sympathy Card for a Color Challenge

Unfortunately I needed some sympathy cards so I used the Create with Connie and Mary Color Challenge#177 here. The colors to use are Night of Navy, Lucky Limeade and River Rock.
The base is Night of Navy card stock and then I added some Lucky Limeade. I used River Rock DSP from the Patterns DSP Neutrals Stack on the bottom. On the top I stamped the greeting from Love and Sympathy in Lucky Limeade. I used my Lucky Limeade and Night of Navy Stampin' Write markers to color in the flower stamp. Finally, some 1/4 inch Night of Navy grosgrain finishes it off.
Here's my recipe:
Stamps: Love & Sympathy
Papers: Very Vanilla, Night of Navy, Lucky Limeade and Patterns DSP Neutrals Stack
Inks: Lucky Limeade Classic pad and Lucky Limeade and Night of Navy Stampin' Write markers
Accessories: 1/4 inch Night of Navy grosgrain

Tuesday, November 29, 2011

Another Thank You for a Sketch

I told you I needed thank you cards, so here's another one but I used the Stamping 411 Sketch#231 here.
I also used the Tagtastic set, which I had out from my last card.
The base is Pear Pizzazz and I added some Very Vanilla with the Spice Cake DSP. I stamped the frame from Tagtastic in Pear Pizzazz and punched it out with the Curly Label punch. I stamped the greeting from Tiny Tags in Soft Suede.I added some Pear Pizzazz that I punched with the Modern Label punch. Then I added two Silver Mini brads and popped it all up with Stampin' dimensionals.
Here's my recipe:
Stamps: Tagtastic and Tiny Tags
Papers: Very Vanilla, Pear Pizzazz and Spice Cake DSP
Inks: Pear Pizzazz and Soft Suede
Accessories: Modern Label and Curly Label punches, Silver Mini brads, Stampin' dimensionals

Monday, November 28, 2011

Thank You for a Splitcoast Sketch

I need a bunch of thank you cards so I used the Splitcoast Sketch#360 here for this one.
The base is Daffodil Delight and I added some Basic Gray and some Domestic Goddess DSP.
I ran the edge of the Basic Gray thru the Scallop Edge Border punch. I stamped the image from Tagtastic in Basic Gray and Daffodil Delight. I cut out the Daffodil part and popped it up with Stampin' dimensionals. I punched the Daffodil circle with the 1 3/4 inch Circle punch and the Gray scallop with the 2 3/8 inch Scallop Circle punch. I used my White Gel pen to add the dots to the scallops. I popped up the entire scallop with Stampin' dimensionals. Finally, some 1/4 inch Daffodil Delight grosgrain ribbon finishes it off.
Here's my recipe:
Stamps: Tagtastic
Papers: Whisper White, Basic Gray, Daffodil Delight and Domestic Goddess DSP
Inks: Basic Gray and Daffodil Delight
Accessories: 2 3/8 inch Scallop Circle punch, 1 3/4 inch Circle punch, Scallop Edge Border punch, Stampin' dimensionals, White Gel pen, 1/4 inch Daffodil Delight grosgrain

Thursday, November 24, 2011

Thank You Card for Two Challenges

I made this thank you card for two challenges. First, the Stamping 411 Sketch#230 here. And second, the SUO Challenges#32 here.               The base is Soft Suede card stock and I added some Pool Party and some Spice Cake DSP. I used the Scallops#2 Bigz die for the Soft Suede scallop circle. I used my Coluzzle circle cutter for the Very Vanilla circle and the 2 1/2 inch Circle punch for the More Mustard circle. I colored the wreath stamp from Warmest of Wishes with my More Mustard, Pool Party and Soft Suede Stampin' write markers and punched it out with the 2 3/8 inch Scallop Circle punch, popping the wreath up with Stampin' dimensionals. I stamped the thanks from Tagtastic in Soft Suede, trimmed it down and popped it up with Stampin' dimensionals. Finally, some 3/ 8 inch Pool Party ruffled ribbon finishes it off.
Here's my recipe:
Stamps:  Tagtastic and Warmest of Wishes
Papers: Very Vanilla, More Mustard, Pool Party, Soft Suede and Spice Cake DSP
Inks: More Mustard, Pool Party, Soft Suede Stampin' Write Markers
Accessories: Scallops #2 Bigz die, Coluzzle, 2 3/8 inch Scallop Circle punch, 2 1/2 inch Circle punch, Stampin' dimensionals, 3/8 inch Pool Party ruffled ribbon

Wednesday, November 23, 2011

A Color Challenge with a MOJO Sketch

I used the MojoMonday Sketch#216 here, along with the Splitcoast Color Combination#350 here.
The colors to use are Blushing Bride, Pear Pizazz and Marina Mist.
The base is Marina Mist and I added papers from the Nursery Nest DSP. I used my 1 1/4 inch Square punch to create the banner on the Blushing Bride piece. I stamped the snowflakes from Snow Burst in Pear Pizzazz and Marina Mist. I punched the smaller ones with the 1/2 inch Circle punch and layered them onto a Pear piece punched with the 3/4 inch Circle punch. I punched the Marina one with the 1 1/4 inch Circle punch and layered it onto a Marina piece punched with the 1 3/8 inch Circle punch. I popped all circles up with Stampin' dimensionals. I stamped Merry from Pennant Parade in Blushing Bride, punched it out with the Word Window punch and layered it onto a Blushing Bride piece punched with the Modern Label punch.
Here's my recipe:
Stamps: Pennant Parade and Snow Burst
Papers: Whisper White, Blushing Bride, Pear Pizzazz, Marina Mist, Nursery Nest DSP
Inks: Blushing Bride, Marina Mist, Pear Pizzazz
Accessories: 1 1/4 inch Square and Circle punches, 1/2 inch, 3/4 inch and 1 3/8 inch Circle punches, Word Window and Modern Label punches, Stampin' dimensionals

Tuesday, November 22, 2011

Create with Connie & Mary Sketch#176

I made this quick card with the Create with Connie and Mary Sketch#176 here.
I started by running the Melon Mambo thru the Big Shot with the Square Lattice embossing folder. I used up scraps of Cheerful Treat DSP, matting the one with some Lucky Limeade. I stamped the flower from Posy Punch twice, once in Lucky Limeade and once in Melon Mambo. I trimmed down the Limeade piece and cut out the Melon center, popping it up with Stampin' dimensionals. I punched the Limeade piece with the Fancy Flower punch and popped it all up with Stampin' dimensionals.
Here's my recipe:
Stamps: Posy Punch
Papers: Whisper White, Lucky Limeade, Melon Mambo and Cheerful Treat DSP
Inks: Lucky Limeade and Melon Mambo
Accessories: Fancy Flower punch, Square Lattice embossing folder, Stampin' dimensionals
 

Monday, November 21, 2011

Save 20 to 60% now thru Nov. 30th!

The Stampin' UP! Online Extravaganza has begun!
For 24 hours, today only, two NEW items are 20% off: Simply Scored-$23.96 and the Sweet Pressed Cookie Stamps-$13.56.

Click on the"Shop Now" button to the right and it will lead you right to my online store.

Also, click here for the pdf of all the other specials, some up to 60% off.

Make sure you use the bundle offer items when ordering to receive the discounts.

Happy shopping and Happy Stamping!

Friday, November 18, 2011

Anniversary Card for a Mojo Sketch

I used the MojoMonday Sketch#215 here for this anniversary card. It's my parent's 46th anniversary on Sunday, along with my daughter's 17th birthday. Needless to say, it's a good day to celebrate!
I started with a Soft Suede base and added some Very Vanilla then some Spice Cake DSP. I used three patterns from the Spice Cake DSP. I stamped the greeting from Happiest Birthday Wishes and the Triple Treat flower in Soft Suede. I punched out the flower with the 5-Petal Flower punch and the center with the 1/2 inch Circle punch. I popped up both circles with Stampin' dimensionals. I punched the More Mustard flowers with the Boho Blossoms Punch and the centers in Soft Suede with the Itty Bitty Shapes pack. I ran the flowers thru the Big Shot with the Square Lattice embossing folder and used the White gel pen to add the centers. Finally, I  poppped up the main flower with Stampin' dimensionals.
Here's my recipe:
Stamps: Triple Treat Flower and Happiest Birthday Wishes
Papers: Very Vanilla, Soft Suede, Pear Pizzazz, More Mustard, Spice Cake DSP
Inks: More Mustard and Soft Suede
Accessories: 5-Petal Flower punch, Boho Blossoms punch, 1/2 inch Circle punch, Itty Bitty Shapes punches pack, Stampin' dimensionals, White Gel pen, Square Lattice embossing folder

Thursday, November 17, 2011

Another Birthday Card for a Sketch

It's my daughter's birthday on Sunday, so I used the Splitcoast Sketch#359 here for this card.
The base is Crumb Cake and I ran that thru the Perfect Polka-dot embossing folder. I added some Real Red Patterns DSP Brights and stamped the balloons from Crazy for Cupcakes on some more DSP, cut them out and popped them up with Stampin' dimensionals. I stamped the main image from Crazy for Cupcakes in Basic Black. I colored it in with my Daffodil Delight, Crumb Cake and Real Red Stampin' Write Markers.
Here's my recipe:
Stamps: Crazy for Cupcakes
Papers: Whisper White, Real Red, Crumb Cake, Patterns DSP Neutrals and Brights Stack
Inks: Basic Black, Daffodil Delight, Crumb Cake and Real Red Stampin' Write Markers
Accessories: Stampin' dimensionals, Perfect Polka-dot embossing folder

Wednesday, November 16, 2011

A Birthday Card for the Stamping 411 Sketch

Long time no post! I had my first craft fair on Sunday and I haven't gotten down to my stampin' space. But I need to send my niece's birthday card, so I made this with the Stamping 411 Sketch#229 here.
The base is Concord Crush. I ran some Melon Mambo thru the Big Shot with the Perfect Polka-dot embossing folder. I added papers from the Cheerful Treat DSP. I punched the Concord scallop circle with the 2 3/8 inch Scallop Circle punch and the 1 3/4 inch Circle punch was used for the Whisper White circle. I stamped the cupcake from Create a Cupcake in Mambo, Concord and Lucky Limeade and used the Cupcake Builder punch to punch them all out. I popped it up with Stampin' dimensionals. I stamped the greeting from Bring on the Cake and colored it in with Melon Mambo and blender pens.
Here's my recipe:
Stamps: Create a Cupcake and Bring on the Cake
Papers: Whisper White, Concord Crush, Melon Mambo, Lucky Limeade, Cheerful Treat DSP
Inks:  Concord Crush, Melon Mambo, Lucky Limeade
Accessories:  Cupcake Builder punch, 1 3/4 inch Circle punch, 2 3/8 inch Scallop Circle punch, White gel pen, Perfect Polka-dot embossing folder, Stampin' dimensionals, Blender pen

Saturday, November 12, 2011

Clean & Simple Birthday

I used the Clean and Simple FTL#165 here for this really quick birthday card. I made a bunch of these to sell at the craft fair.
The base is Pacific Point and I added some retired Celebrations DSP ( you could use the current Big Top Birthday DSP instead) and a strip of Real Red. The stamps from Party This Way were inked up in Pacific Point and Real Red. I cut the balloons and arrow out and used the Word Window punch on the greeting. The arrow an one balloon are popped up with Stampin' dimensionals.
Here's my recipe:
Stamps: Party This Way
Papers: Whisper White, Real Red, Pacific Point, Celebrations DSP
Ink: Real Red and Pacific Point
Accessories: Word window punch and Stampin' dimensionals

Friday, November 11, 2011

Craft Fair Pencil Toppers

I've started to take pics of my goodies I've made for the craft fairs coming up.

I've made a bunch of these Punch Art pencil toppers. I saw samples of these on both Splitcoast Stampers here, and on Stampin' Connection, a resource for Stampin' UP! demos.
I don't have time to give directions for each of them but I'll list the supplies! Off to craft some more!
Here's my recipe:
Stamps: none
Papers: Whisper White, Chocolate Chip, Basic Black, Pumpkin Pie, Real Red, Red Glimmer Paper, Blushing Bride
Inks: Basic Black Stampin' Write marker
Accessories: White Gel pen, 1/2 inch Circle punch(Santa tassel & reindeer nose), Large(Santa hat and hair) and Small Oval punches(Santa face), Owl Builder punch(Santa and reindeer eyes), Ornament punch(Santa beard), 5-petal flower punch(Santa mustache), Stocking builder punch, Snowflake punch(reindeer antlers), Curly label punch(snowman hat), Word window punch(Snowman hat), Hounds tooth, Snow Burst and Square Lattice embossing folders, 1 by 8 Cello bags,

Thursday, November 10, 2011

Christmas Card

It's been a while since I posted because I've been furiously crafting for the two craft fairs I have coming up. If you live in SE Wisc come see me at the Winter Wonderland Fair, Sunday, Nov. 13th from 9a to 4p at Serb Hall. And then on Sat, Nov 19th, I'm at the Holly Dazical Fair from 9a to 4p at Elmwood Elementary in New Berlin.
I'll be posting pics of my creations soon!
I made this quick card for the Splitcoast Sketch#358 here. And it's for PPA#119 here-Holiday.
The base is Cherry Cobbler. I ran some Garden Green thru the Big Shot with the Snow Burst embossing folder. I added some Frostwood Lodge DSP. I cut out the Garden Green oval with my Coluzzle and punched out the Whisper White one with the Large Oval punch. I stamped the "tree" from Pennant Parade in Garden Green, the stand in Early Espresso and the star in Cherry Cobbler. I used the Itty Bitty Shapes punches pack to punch out the star. The tree, star and green oval were all popped up with Stampin' dimensionals. I stamped Merry Christmas from Petite Pairs in Cherry Cobbler, punched it out with the retired Small Oval punch and layered in onto a Cherry Cobbler piece punched with the Small Oval punch.
Here's my recipe:
Stamps: Pennant Parade, Petite Pairs
Papers: Whisper White, Cherry Cobbler, Garden Green, Frostwood Lodge DSP
Inks: Cherry Cobbler, Garden Green, Early Espresso
Accessories: Snow Burst embossing folder, Small and Large Oval punches, Coluzzle, Itty Bitty Shapes Punches pack, Stampin' dimensionals

Saturday, November 5, 2011

Big Shot Purse

I realized that I'd made this purse a while back but never posted it. It's perfect for a gift card, candy, jewelry etc, and it's made with Big Shot dies. I've made these before and saw the instructions on Becky Robert's blog here. 
I ran some Melon Mambo thru the Big Shot with the Top Note die and then ran some Cheerful Treat DSP thru too. I trimmed down the DSP. I also used the Scallop Circle#2 die for the flap and the Circles#2 die too. I dotted the scallops with my White Gel pen. I punched out a Lucky Limeade circle with the 1 3/8 inch Circle punch. I stamped the flower from Fruit and Flowers in Melon Mambo, cut it out and added a Lucky Limeade Designer Printed Brad. I used some retired Jumbo eyelets and then finally, some 3/8 inch Lucky Limeade ruffled ribbon.
Here's my recipe:
Stamps: Fruit and Flowers
Papers: Whisper White, Lucky Limeade, Melon Mambo, Cheerful Treat DSP
Inks: Melon Mambo
Accessories: Circles#2 and Scallop Circle#2 Big Shot dies, 1 3/8 inch Circle punch, retired Jumbo Eyelets, 3/8 inch Lucky Limeade Ruffled ribbon, white gel pen, Lucky Limeade Designer Printed brad

Friday, November 4, 2011

A Card for a Sketch & Color Challenge

I used the Create with Connie and Mary Sketch#174 here, along with the PPA#118 Color Challenge here, to create this card. The colors to use are River Rock, Soft Suede and Early Espresso.
The base is Very Vanilla and I added papers from the Patterns DSP Neutrals Stack. I ran some Soft Suede thru the Big Shot with the Square Lattice embossing folder and used my 1 1/4 inch Square punch to notch out the end. I punched the Espresso circle with the 2 1/2 inch Circle punch and the River Rock scallop with the 2 3/8 inch Scallop Circle punch. The 1 3/4 inch Circle punch was used for the Suede circle. I stamped the flower from Flower Fest in Soft Suede and cut it out. I stamped it again on some of the River Rock DSP and cut it out too. I added a Basic Glimmer Brad and popped up the flower with Stampin' dimensionals.
Here's my recipe:
Stamps: Flower Fest
Papers: Very Vanilla, River Rock, Soft Suede, Early Espresso, Patterns DSP Neutrals Stack
Inks: Soft Suede
Accessories: Square Lattice embossing folder, 2 3/8 inch Scallop Circle punch, 2 1/2 inch and 1 3/4 inch Circle punches, Basic Glimmer brad and Stampin' dimensionals, 1 1/4 inch Square punch

Wednesday, November 2, 2011

Christmas Card for a Sketch

I made this quick Christmas card using the Splitcoast Sketch#357 here.
The base is Garden Green card stock. I ran some Whisper White thru the Big Shot with the Northern Flurry Textured Impressions Embossing Folder. I matted that with some Cherry Cobbler and added some Frostwood Lodge DSP to the bottom. I also ran the DSP thru the Scallop Edge Border punch. I colored in the stamp from Season of Joy with my Cherry Cobbler and Garden Green Stampin' Write markers. I cut that out and popped it up with a Stampin' dimensional. I punched a 1 3/8 inch Circle of Cherry Cobbler and then a 1 3/4 inch Scallop Circle of Garden Green, adding dots with my White Gel pen. I popped that whole piece up with Stampin' dimensionals. I stamped Merry Christmas from Teeny Tiny Wishes in Cherry Cobbler and punched it out with the Word Window punch. Finally, I added some 3/8 inch Cherry Cobbler Quilted Satin ribbon.
Here's my recipe:
Stamps: Teeny Tiny Wishes and Season of Joy
Papers: Whisper White, Cherry Cobbler, Garden Green and Frostwood Lodge DSP
Inks: Cherry Cobbler and Garden Green
Accessories: Northern Flurry embossing folder, 1 3/8 inch Circle punch, 1 3/4 inch Scallop Circle punch, Scallop Edge Border punch, Stampin' dimensionals, White Gel pen, 3/8 inch Cherry Cobbler Quilted Satin ribbon, Word Window punch 

Tuesday, November 1, 2011

Thinking of You

I made this quick card for three challenges. First, I used the Stamping 411 Sketch#227 here. Second, I used the Splitcoast Color Combination #347 here. The colors to use are Bravo Burgundy, Always Artichoke and More Mustard. And finally, it qualifies for the SUO Challenge#31 here-Thinking of You.
The base is More Mustard and I added some Always Artichoke and some Spice Cake DSP. I stamped the Triple Treat Flower three times in each color. I punched out a More Mustard piece with the Fancy Flower punch and used that again to punch out the Artichoke flower. I used the 5-Petal Flower punch on the Mustard part and the 1/2 inch Circle punch on the Burgundy circle. I popped up the Mustard and Burgundy pieces with Stampin' dimensionals. I stamped thinking of you from Trendy Trees  in Burgundy and punched it out with the Word Window punch. I punched the Mustard piece with the Modern Label punch. Finally, some 1/2 inch Always Artichoke Seam Binding finishes it off.
Here's my recipe:
Stamps: Triple Treat Flower and Trendy Trees
Papers: Very Vanilla, Always Artichoke, More Mustard, Spice Cake DSP
Inks: Always Artichoke, Bravo Burgundy, More Mustard
Accessories: 5-Petal Flower punch, Fancy Flower punch, 1/2 inch Circle punch, Word Window and Modern Label punches, Stampin' dimensionals, 1/2 inch Always Artichoke seam binding

Friday, October 28, 2011

Christmas Joy for the PPA Challege

This card qualifies for the PPA#117-CAS-Ribbon here.
The base is Cherry Cobbler. I ran some Crumb Cake thru the Big Shot with the Snow Burst embossing folder. I added some Crumb Cake Patterns DSP from the Neutrals Stack and ran the edge thru the Scallop Edge Border punch. I stamped the star from The Sounding Joy in Crumb Cake. I stamped Joy in Versamark,  added some Cherry Cobbler Stampin' Emboss powder and heated it up. Finally, some 1/2 inch Cherry Cobbler Seam binding finishes it off.
Here's my recipe:
Stamps: The Sounding Joy
Papers: Whisper White, Crumb Cake, Cherry Cobbler, Patterns DSP Neutrals Stack
Inks: Crumb Cake, Versamark
Accessories: Cherry Cobbler Stampin' Emboss powder, Snow Burst embossing folder, Scallop Edge Border punch, 1/2 inch Cherry Cobbler seam binding

Wednesday, October 26, 2011

Halloween Card for a Splitcoast Sketch

I made this last Halloween card for the year for the Splitcoast Sketch#356 here.
The base is Basic Black card stock and I added two papers from the Frightful Sight DSP. I stamped the images from Out on a Limb in Cajun Craze and Old Olive. I used my Basic Black, Cajun Craze and Old Olive Stampin' Write markers to color in the greeting from Wicked Cool. Each image was punched out with the 1 1/4 inch Square punch and layered onto Basic Black punched with the 1 3/8 inch Square punch. I popped up the squares with Stampin' dimensionals. Finally, I added some 1/4 inch Basic Black grosgrain.
Here's my recipe:
Stamps: Out On a Limb and Wicked Cool
Papers: Whisper White, Basic Black, Old Olive, Frightful Sight DSP
Inks: Basic Black, Cajun Craze and Old Olive
Accessories: 1 1/4 inch and 1 3/8 inch Square punches, 1/4 inch Basic Black grosgrain, Stampin' dimensionals

Tuesday, October 25, 2011

Very Merry Card

This card uses the Stamping 411 Sketch#226 here. And I combined it with the Splitcoast Color Combination#346 here.   The colors to use are Rich Razzleberry, Island Indigo and Baha Breeze.
The base is Baha Breeze. I ran some Island Indigo thru the Big Shot with the Snow Burst embossing folder. I added some Rich Razzleberry DSP from the Patterns DSP Brights Stack. I stamped the snowman image from Tags til Christmas in Baha Breeze and used the Razzleberry and Indigo Stampin' Write markers to color in the hat and scarf. I punched it out with the 1 3/4 inch Circle punch and trimmed it down a bit.I used that same punch for the Breeze circle. I used the Circles #2 die for the Indigo circle. I punched the Razzleberry piece with the 2 3/8 inch Scallop circle and popped up all of it with Stampin' dimensionals. I stamped Very Merry from Short and Sweet in Indigo. Finally, some 3/8 inch Whisper White taffeta ribbon finishes it off.
Here's my recipe:
Stamps: Short and Sweet and Tags til Christmas
Papers: Whisper White, Baha Breeze, Island Indigo, Rich Razzleberry, Patterns DSP Brights Stack
Inks: Baha Breeze, Island Indigo, Rich Razzleberry
Accessories: 2 3/8 inch Scallop Circle punch, Circles #2 die, Snow Burst embossing folder, Stampin' dimensionals, 1 3/4 inch Circle punch, 3/8 inch Whisper White taffeta ribbon

Monday, October 24, 2011

Clean and Simple Thanks

I made this CAS thank you using the Clean and Simple FTL#163 here.
The base is Early Espresso and I added some Pretty in Pink that I ran thru the Big Shot with the Perfect Polka Dots textured impressions embossing folder. I stamped the flower from Printed Petals three times, in Pretty in Pink, Rich Razzleberry and Early Espresso, cutting them out and popping them up with Stampin' dimensionals. Finally, I stamped the sentiment from Thank You Kindly in Early Espresso.
Here's my recipe:
Stamps: Thank You Kindly and Printed Petals
Papers: Whisper White, Pretty in Pink and Early Espresso
Inks: Pretty in Pink, Early Espresso and Rich Razzleberry
Accessories: Perfect Polka Dots embossing folder, Stampin' dimensionals

Friday, October 21, 2011

Another Christmas Card for a Sketch

Here's another Christmas card for the sketch at PPA-#116 here. It's a square one but I modified it a bit.
I started with Real Red card stock and added some Holly Berry Bouquet DSP. I ran some Wild Wasabi thru the Big Shot with the Snow Burst embossing folder. I stamped the tree from Snow Swirled in Versamark and added some Wild Wasabi Stampin' emboss powder. I stamped the snowflake from that set in Real Red, cut it out and popped it up with Stampin' dimensionals. Finally, some 5/8 inch Real Red Satin ribbon finishes it off.
Here's my recipe:
Stamps: Snow Swirled
Papers: Very Vanilla, Real Red, Wild Wasabi, Holly Berry Bouquet DSP
Inks:  Versamark and Real Red
Accessories: Wild Wasabi Stampin' emboss powder, Stampin' dimensionals, Snow Burst embossing folder, 5/8 inch Real Red Satin ribbon

Thursday, October 20, 2011

Frostwood Lodge Christmas Card for a Sketch

I used the Create With Connie and Mary Sketch#172 here for this Christmas card.
I started with some Crumb Cake card stock and added some Frostwood Lodge DSP. I ran the Garden Green thru the Big Shot with the Houndstooth embossing folder and the Whisper White piece thru it with the Snow Burst embossing folder too.
I ran some Whisper White thru the Scallop Edge Border punch and used the Decorative Label punch on the Whisper White and Cherry Cobbler pieces. I stamped the stocking from Stitched Stockings in Garden Green and Cherry Cobbler, using the Stocking Builder punch to piece it all together. I added some Cherry Cobbler/White twine to the corner and popped it up with Stampin' dimensionals. I stamped the greeting from Teeny Tiny Wishes in Garden Green, punched it out with the Word Window punch and layered it onto a Garden Green piece punched with the Modern Label punch. Finally, some Cherry Cobbler 1/2 inch Scallop Dots Ribbon finishes it off.
Here's my recipe:
Stamps: Stitched Stockings and Teeny Tiny Wishes
Papers: Whisper White, Cherry Cobbler, Garden Green, Crumb Cake, Frostwood Lodge DSP
Inks: Cherry Cobbler and Garden Green
Accessories: Houndstooth and Snow Burst embossing folders, Stocking Builder, Decorative Label, Modern Label and Word Window Punches, Stampin' dimensionals, Scallop Edge Border punch, Cherry Cobbler/White twine, Cherry Cobbler 1/2 inch Scallop Dots ribbon

Wednesday, October 19, 2011

Splitcoast Sketch#355

I used the Splitcoast Sketch#355 here for this card. And since I had the Spice Cake DSP out for my last card I used that again too.
The base is More Mustard card stock and I added four papers from the Spice Cake DSP. I stamped the leaf and sentiment from Day of Gratitude in More Mustard and Soft Suede. Finally, I added some 3/8 inch Soft Suede taffeta ribbon.
Here's my recipe:
Stamps: Day of Gratitude
Papers: Very Vanilla, More Mustard, Soft Suede, Spice Cake DSP
Inks: More Mustard and Soft Suede
Accessories: 3/8 inch Soft Suede taffeta ribbon

Tuesday, October 18, 2011

Thanksgiving Card for Two Challenges

I made this Thanksgiving card for two challenges.
First the PPA#115-Fall/Thanksgiving, here. And second, the Stamping 411 Sketch#225 here.
The base is Soft Suede card stock and I added papers from the Spice Cake DSP. I stamped the Triple Treat Flower three times, in Soft Suede, Pear Pizzazz and Pool Party. I punched the Pear part out with the 5-Petal flower punch and the Pool part out with the 1/2 inch Circle punch, popping up each layer with Stampin' dimensionals. I stamped Happy Thanksgiving from Teeny Tiny Wishes in Soft Suede and used the Stamp-a-ma-jig to position it just right. I punched that out with the Curly Label punch and added some Soft Suede behind that with the same punch, Finally, some 3/8 inch Pool Party ruffled ribbon finishes it off.
Here's my recipe:
Stamps: Triple Treat Flower and Teeny Tiny Wishes
Papers: Very Vanilla, Soft Suede, Pool Party, Spice Cake DSP
Inks: Soft Suede, Pool Party, Pear Pizzazz
Accessories: Curly Label punch, 5-petal Flower punch, 1/2 inch Circle punch, Stamp-a-ma-jig, Stampin' dimensionals, 3/8 inch Pool Party ruffled ribbon

Saturday, October 15, 2011

Happy 13th Birthday Max!

It's my youngest child's 13th birthday today and I made this card for him using the Clean and Simple Stamping FTL#161 here.
It's a bright card for a bright, kind, athletic teenager. His turning 13 means we have three teens in the house now-WOW!
Back to the card description.
The base is Tempting Turquoise and I added some Real Red and DSP from the Big Top Birthday DSP. I stamped the image from Bring on the Cake in Tempting Turquoise and colored it in with my Real Red Stampin' Write marker. I layered a Real Red piece punched with the Decorative Label punch behind the image. I stamped the saying from  Crazy for Cupcakes in Real Red and the little asterisk from Pennant Parade in Tempting Turquoise. I used the 1 1/4 inch Circle punch and then the 1 3/8 inch Circle punch, cutting them in half. Finally, some 1/4 inch Real Red grosgrain finishes it off.
Here's my recipe:
Stamps: Bring on the Cake, Pennant Parade, Crazy for Cupcakes
Papers: Whisper White, Real Red, Tempting Turquoise, Big Top Birthday
Inks: Real Red and Tempting Turquoise
Accessories: 1 1/4 inch and 1 3/8 inch Circle punches, Decorative Label punch, 1/4 inch Real Red grosgrain

Friday, October 14, 2011

Create with Connie and Mary Challenge

I made this Christmas card for the Create with Connie and Mary Color Challenge#171 here. The colors to use are Bravo Burgundy, River Rock and Baha Breeze.
My base is River Rock card stock and I ran it thru the Big Shot with the Snow Burst embossing folder. I ran some Bravo Burgundy thru the Scallop Edge Border punch. I stamped the snowflakes from Snow Swirled in the three colors. I stamped the greeting from Snow Swirled in Bravo Burgundy and used the Extra Large Oval punch to punch it out. That was layered onto some Bravo Burgundy punched with the Decorative Label punch and popped up with Stampin' dimensionals. Finally, some 1/2 inch Baha Breeze seam binding finishes it off.
Here's my recipe:
Stamps: Snow Swirled
Papers: Whisper White, River Rock, Bravo Burgundy, Baha Breeze and Patterns DSP Neutrals Stack
Inks: River Rock, Bravo Burgundy, Baha Breeze
Accessories: Decorative Label punch, Extra Large Oval punch, Scallop Edge Border punch, Snow Burst embossing folder, Stampin' dimensionals, 1/2 inch Baha Breeze seam binding

Thursday, October 13, 2011

Splitcoast Sketch Thank You

I used the Splitcoast Sketch#354 here for this thank you card.
The base is Soft Suede and I ran it thru the Big Shot with the Square Lattice textured impressions embossing folder. I then used papers from the Spice Cake DSP, matting them in Pear Pizzazz and Pool Party and using the Corner Rounder punch on a few corners. I colored in the stamp from Day of Gratitude with my Pool Party, Soft Suede, More Mustard and Pear Pizzazz Stampin' Write Markers. I rounded the corners of those pieces too. I ran the edge of the Pool Party piece thru the Scallop Edge Border punch and added dots with the Soft Suede Stampin' Write marker. I stamped thank you from Day of Gratitude in Soft Suede and punched it out with the Word Window punch, trimming it down. Finally, some 3/8 inch Soft Suede taffeta ribbon finishes it off.
Here's my recipe:
Stamps: Day of Gratitude
Papers: Very Vanilla, Pool Party, More Mustard, Soft Suede, Pear Pizzazz and Spice Cake DSP
Inks: Pool Party, More Mustard, Soft Suede and Pear Pizzazz
Accessories: Square Lattice embossing folder, Word Window punch, Corner Rounder punch, Scallop Edge Border punch, 3/8 inch Soft Suede taffeta ribbon

Wednesday, October 12, 2011

Holiday Stocking Gift Card Holder


I finally got my order with the new Holiday Stocking die and had to use it to make a gift card holder. Who doesn't need those at the holidays?
I used some Real Red from the Patterns DSP Brights Stack and some of the new Silver Glimmer Paper. For the back of the stocking I used Real Red card stock. I just adhered the two pieces together on the edges, leaving a space in the middle to slip in the gift card. I stamped the ornament from Delightful Decorations in Real Red and used the Ornament punch to punch it out. I attached the ornament and some 5/8 inch Real Red Satin ribbon with a Silver Glimmer Brad.
Here's my recipe:
Stamps: Delightful Decorations
Papers: Whisper White, Real Red, Patterns DSP Brights Stack, Silver Glimmer Paper
Inks: Real Red
Accessories: Silver Glimmer Brad, Ornament Punch, 5/8 inch Real Red Satin ribbon, Holiday Stocking Bigz Die

Tuesday, October 11, 2011

A Card for a Color Challenge and a Sketch

I made this card for the PPA Color Challenge #114 here, to use Rich Razzleberry, Lucky Limeade and Pumpkin Pie. And used the sketch from the Clean and Simple Stamping FTL#160 here.
The base is Rich Razzleberry card stock and I added a strip of Pumpkin Pie Patterns DSP from the Brights Stack. I stamped the leaf from Day of Gratitude in the three colors. I ran a strip of Pumpkin Pie thru the Scallop Edge Border punch. I stamped thinking of you from Trendy Trees in Rich Razzleberry. I punched that out with the Word Window punch and layered it onto a Rich Razzleberry piece punched with the Modern Label punch, popping it up with Stampin' dimensionals.
Here's my recipe:
Stamps: Day of Gratitude and Trendy Trees
Papers: Whisper White, Rich Razzleberry, Pumpkin Pie and Patterns DSP Brights Stack
Inks: Rich Razzleberry, Pumpkin Pie and Lucky Limeade
Accessories: Scallop Edge Border punch, Word Window and Modern Label punches, Stampin' dimensionals

Friday, October 7, 2011

Halloween Shadow Box

I found this box at the Dollar Tree and thought I'd try making a Halloween decoration.
I painted it with some black acrylic paint. I cut out 8 different papers from the Frightful Sight DSP and glued them down with the Anywhere Glue Stick. I stamped the cat from Out on a Limb in Basic Black. The pumpkin is from Got Treats and I colored that with my Old Olive and Cajun Craze Stampin' Write markers. Spooky, the witches hat and the greeting are all from Wicked Cool and I stamped those in Old Olive, Cajun Craze and Basic Black. I punched  out the greeting with the Small Oval punch and layered it onto a Cajun Craze circle punched with the 1 inch Circle punch. All the items were popped up with Stampin' dimensionals.  I painted over everything with a coat of Mod Podge glue to seal it. Finally, I attached some 1/2 inch Old Olive Scallop Dots Ribbon for a hanger.

Here's my recipe:
Stamps: Out on a Limb and Wicked Cool, Got Treats
Papers: Whisper White, Cajun Craze and Frightful Sight DSP
Inks: Basic Black, Cajun Craze, Old Olive
Accessories: Stampin' dimensionals, Anywhere Glue Stick, 1/2 inch Old Olive Scallop Dots ribbon, Dollar Tree shadow box, black acrylic paint, Mod Podge glue

Thursday, October 6, 2011

Christmas Card for a Splitcoast Sketch

This Christmas card is for the Splitcoast Sketch#353 here.
The base is Real Red card stock and I added papers from the Holly Berry Bouquet Specialty DSP. I colored the stamp from Bells and Boughs with my Chocolate Chip, Real Red and Wild Wasabi Stampin' Write markers then used the same color ink pad and blender pens to color in the image. I stamped the greeting from that set in Real Red on Very Vanilla and punched it out with the Scallop Oval punch. I popped up that oval and the smallest square with Stampin' dimensionals.
Here's my recipe:
Stamps: Bells and Boughs
Papers: Very Vanilla, Chocolate Chip, Real Red, Wild Wasabi and Holly Berry Bouquet DSP
Inks: Chocolate Chip, Real Red and Wild Wasabi
Accessories: Blender pens, Scallop Oval punch, Stampin' dimensionals

Wednesday, October 5, 2011

Mojo Sketch & Splitcoast Color Challenge

This card uses the MojoMonday Sketch#209 here, and the Splitcoast Color Combination#343 here.
The colors to use are Soft Suede, More Mustard and Tangerine Tango.
The base is Soft Suede and I added some Very Vanilla and Tangerine Tango Patterns DSP. I also used some First Edition Specialty DSP and matted it with More Mustard. I ran some Soft Suede thru the Dotted Scallop Ribbon Border punch. I stamped the cupcake and flower from Create a Cupcake in the three inks and punched it out with the Cupcake Builder punch, popping it up with Stampin' dimensionals. I punched the Soft Suede scallop with the 2 3/8 inch Scallop Circle punch. The Circles#2 Big Shot die was used on the Tangerine and Very Vanilla circles and the 1 3/4 inch Circle punch was used for the More Mustard circle. I popped up the entire scallop and circles with Stampin' dimensionals. I stamped the greeting from Happiest Birthday Wishes in Tangerine Tango. Finally, some 1/2 inch Tangerine Tango Scallop Dots Ribbon finishes it off.
Here's my recipe:
Stamps: Create a Cupcake and Happiest Birthday Wishes
Papers: Very Vanilla, More Mustard, Tangerine Tango, Soft Suede, First Edition Specialty DSP, Patterns DSP Brights Stack
Inks: Soft Suede, More Mustard, Tangerine Tango
Accessories: 1/2 inch Tangerine Tango Scallop Dots ribbon, Dotted Scallop Ribbon Border punch, Circles #2 Big Shot die, 2 3/8 Scallop Circle punch, 1 3/4 inch Circle punch, Stampin' dimensionals

Tuesday, October 4, 2011

Birthday Card for a Sketch

I made this birthday card with the Stamping 411 Sketch#223 here.
I started with Wisteria Wonder card stock, added some Early Espresso card stock and then some Berry Blossoms DSP. I colored in the stamp from Happiest Birthday Wishes with my Calypso Coral, Lucky Limeade, Wisteria Wonder and Early Espresso Stampin' Write Markers. I punched that out with the Large Oval punch and matted it with some Early Espresso that I cut out with my Oval Coluzzle cutter. I punched a flower with the Blossom Bouquet Triple Layer punch and some Berry Blossoms DSP. I punched some Wisteria Wonder with the 1/2 inch Circle punch and added a Lucky Limeade Designer Printed brad. I popped up the oval and flower with Stampin' dimensionals. Finally, some 3/8 inch Lucky Limeade ruffled ribbon finishes it off.
Here's my recipe:
Stamps: Happiest Birthday Wishes
Papers: Whisper White, Early Espresso, Wisteria Wonder, Berry Blossoms DSP
Inks: Early Espresso, Calypso Coral, Lucky Limeade and Wisteria Wonder Stampin' Write markers
Accessories: Large Oval punch, Coluzzle oval cutter, Blossom Bouquet Triple Layer punch, 1/2 inch Circle punch, Designer Printed brads, 3/8 inch Lucky Limeade ruffled ribbon, Stampin' dimensionals

Monday, October 3, 2011

Christmas Card for a Sketch and Challenge

I made this Christmas card with the Splitcoast Sketch#352 here.  And for the PPA#113-Technique-Heat Embossing, here.
The base is Wild Wasabi card stock and I added papers from the Holly Berry Bouquet Specialty DSP. I matted two of them with Real Red. The strip of Wild Wasabi  and the circle of Very Vanilla was run thru the Big Shot with the Snow Burst textured impressions embossing folder. I stamped the ornament from Delightful Decorations in Versamark, heated it up and embossed it with Wild Wasabi Stampin' emboss power. Then I used the Ornament punch to punch it out and popped it up with Stampin' dimensionals. I also embossed the greeting from Season of Joy with Wild Wasabi Stampin' emboss power. That was then punched out with the Large Oval punch and layered onto some Wild Wasabi punched with the Scallop Oval punch. Finally, some 1/4 inch Real Red grosgrain finishes it off.
Here's my recipe:
Stamps: Delightful Decorations and Season of Joy
Papers: Very Vanilla, Real Red, Wild Wasabi, Holly Berry Bouquet Specialty DSP
Inks: Versamark
Accessories: Wild Wasabi Stampin' emboss powder, Large Oval and Scallop Oval punches, Snow Burst embossing folder, heat gun, 1/4 inch Real Red grosgrain ribbon, Circles#2 Big Shot die, Stampin' dimensionals

Sunday, October 2, 2011

Stampin UP! Promotions

From now thru October 31st, sign up to become a demonstrator and get a FREE Big Shot or up to $100 in FREE Stampin' UP! products.

In addition, the new-demonstrator Starter Kit-a steal at just $175- contains over $345 worth of stamp sets, card stock, ink, accessories, and business supplies.

Contact me if you'd like to become part of the Stampin' UP! family.


Get a FREE Stamp Set!

During October, buy two Simply sent card kits and get a coordinating stamp set for FREE!

See pages 192-193 of the Idea Book & Catalog for the card kits and stamp sets.

For only $16.95 the set includes a solid wood handle with three interchangeable stamp images, two recipes, and tips for use. Ask me for more info and which stamp sets that coordinate with the cookie press.